
Synapse link approach architecture shows how data flows from Dynamics 365 Finance & Operations (F&O) and Dataverse to Azure Synapse Analytics for reporting in Power BI.
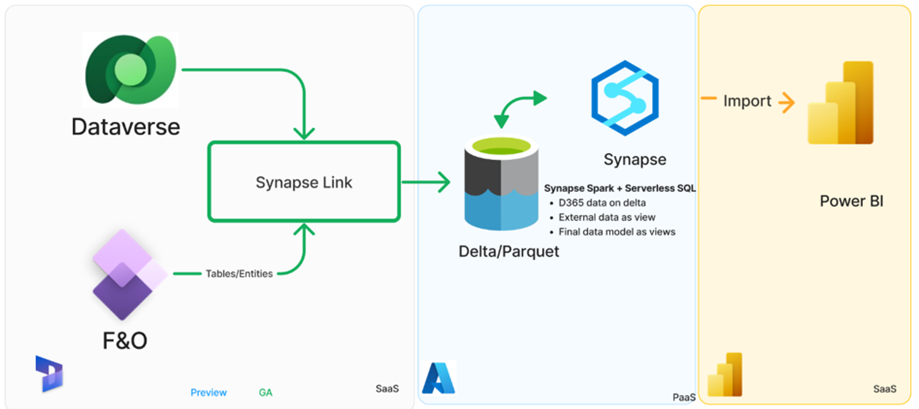
Main components
The core technologies involved in the Synapse Link configuration are listed as follows. Each component plays a distinct role in moving, storing, transforming, and visualizing data.
- F&O & Dataverse → Source systems with business data (ProERP,ProOps)
- Synapse Link → Connects these sources to Azure Synapse.
- Delta / Parquet → Data storage formats.
- Synapse → For querying, transforming, and modeling data.
- Power BI → For dashboards, visualization and analytics.
Component details
The following provides deeper insight into how each component functions within the data pipeline:
- Finance & Operations (F&O): Generate transactional data like invoices and payment status.
- Dataverse: A cloud data platform storing tables/entities.
- Synapse Link: A Microsoft feature to move data from Dataverse/F&O to Synapse in real-time, No need for complex ETL pipelines.
- Delta / Parquet: Data is organized in Delta or Parquet format for analytics. Delta is preferred than parquet because it supports incremental loads, updates, and deletes
- Synapse Spark combines data from different sources and cleans it.
- Serverless SQL: Reads data directly from the data lake using SQL without storing it in Synapse.
- D365 Data on Delta: Data from Dynamics 365 stored in Delta format, this enables incremental refresh, updates, and reliability.
- External Data as View: Additional data sources outside D365 brought into Synapse and combined with D365 data using views.
- Final Data Model as Views: After combining D365 F&O, Dataverse and external data, Business views create using Synapse analytics
- Power BI: Data modelling, relationships establishment, data set and report creation.
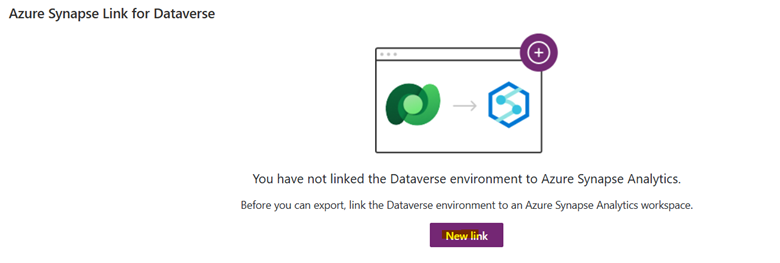
Creating the Synapse Link.
To create the Synapse Link:
- Open make.powerapps.com
- Select the Environment which is connected to Finance and Operations.
- Navigate to below path
- Click on … More > Discover All > Azure Synapse Link.
- Enable pin icon to make it available in the left side tab.

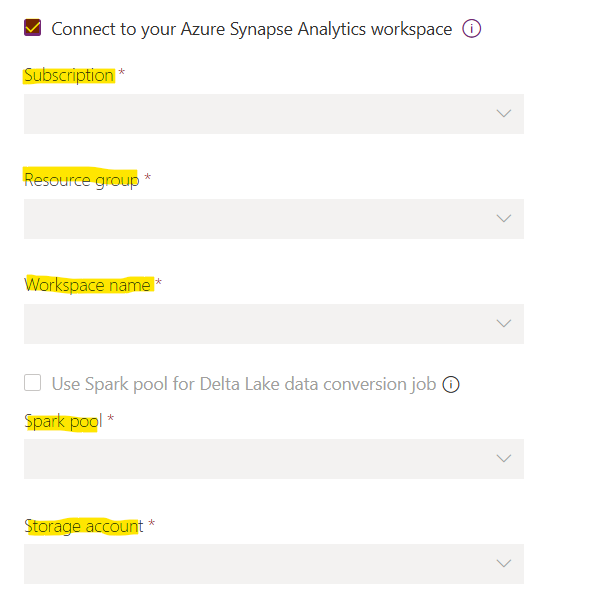
6. Click on new link
7. Provide below highlighted details can click on next.
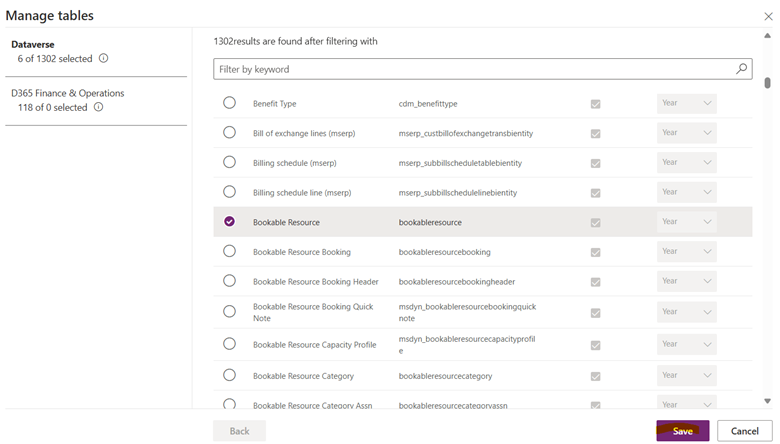
8. Once Azure synapse link is ready, user can select the required tables used for reporting and click on save.
Recommended selection is max 20 tables at once.
Post your comment on this topic.