Azure Analysis Services is a fully managed platform that provides enterprise-grade data models in the cloud. You can use advanced mashup and modelling features to combine data from multiple data sources, including on premise databases and cloud databases, as well as defining metrics and securing your data in a single tabular data model. This data model can then be used to provide users an easier and faster way to browse the data that it holds for ad-hoc analysis.
One of the benefits of using Azure Analysis Services over SQL Server Analysis Services is that you can scale your server up and down, and even pause the service when it is not in use. This means you only pay for what you use.
This document will go over how-to setup an Azure Analysis Services as well as any other resources that may be required to allow you to deploy your model.
Login to the Azure Portal
The first thing you need to do to create your Azure Analysis Service is to login into the azure portal. This can be done by following the steps below:
- Go to the azure login portal. The address for this is: https://portal.azure.com
- Login in using the required login details.
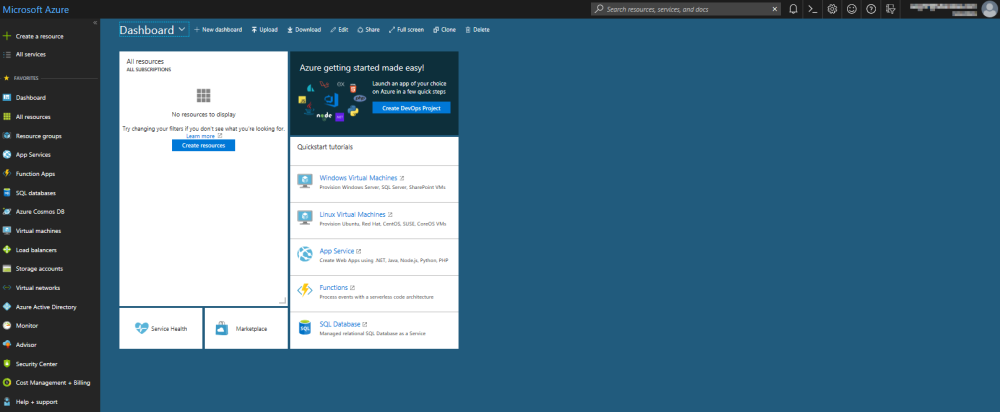
- Once logged in you should be greeted by the azure dashboard.
Create a server
Once logged into the Azure Portal you can then start creating your required resources. For this stage we will create the Azure Analysis Server. To do this follow the steps below:
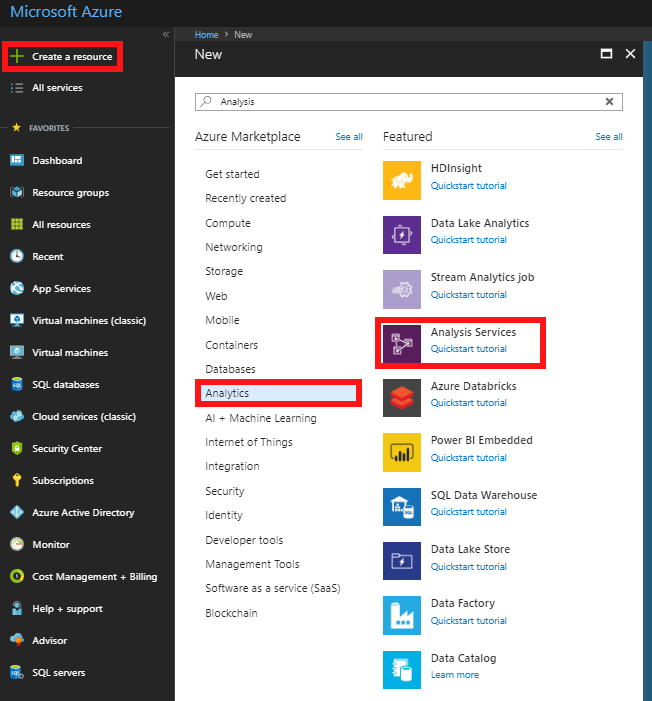
- Click create a resource which will open the Azure marketplace.
- In the list on the left-hand side of the market place select Analytics.
- When the featured list on the right-hand side updates select Analysis Services.
- In the analysis services window which is displayed, fill the in the required fields and then press the create button at the bottom of the window. An overview of the fields is given in the table below.
| Setting | Suggested Value | Description |
| Server Name | Any descriptive name | This needs to be a unique named which will be used to reference the server. The server name must begin with a letter, be lowercase alphanumeric and be between 3 and 63 characters in length. |
| Subscription | Your subscription | Select the subscription that this resource will be associated to. |
| Resource Group | The resource group that this server will belong to | Remember that all items in a resource group share the same lifecycle. They are deployed, updated and deleted together. If you require this item to be on a different deployment cycle, then you will need to create a new group. |
| Location | Any Valid Location | This location should be valid for the location it is required. I.e. Setting up a server in Australia East to be used in America may cause some speed issues. For more information on regions please see Azure Regions |
| Pricing Tier | Select a pricing tier | For more information on azure pricing please see Azure Analysis Services pricing |
| Administrator | By default this will be the account you are logged in as. | Administrators must be a valid user or security enabled group in Azure Active Directory. Microsoft accounts are currently not supported. |
| Backup Storage Settings | This is optional. If you already have a storage account set up you can specify it now. | This setting can be set later if you currently don’t have a storage account available. You can’t create a storage account whilst building an Azure Analysis Services resource. |
| Storage key expiration | This is optional. If you do want a storage key expiration you can select 1 or 2 years. |
Backup and Restore
Backing up tabular model databases in Azure Analysis Services is much the same as for on-premises Analysis Services. The primary different between the two is where you store the backup file. For in-memory tabular models, both the model data and metadata are stored. For Direct Query tabular models, only the model data is stored.
Configure storage settings
Before you can backup you need to configure the storage settings for your server. This can be done by following the below steps.
- Go into your Azure Analysis Services overview page.
- This can be done by clicking the All Resources button which can be found in your favorites. From the list of resources click on your server’s name.
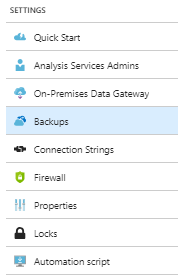
- In the overview page, select the Backups option which can be found under the settings sections (see figure 3 to the right).
- Click Enabled, and then click the Backup Storage Settings located just underneath the Enable/Disable switch.
- Select your storage account, or create a new one.
- Select a container or create a new one.
- Save your settings.
Backup
To back up a database you can either use SQL Server Management Studio (SSMS) or PowerShell. This document will go over the backup process using SQL Server Management Studio which is documented below.
- Open SQL Server Management Studio and connect to your Azure Analysis Service resource.
- Once connected, expand the database folder and right click the database you wish to back up and press Back Up.
- This will open the Backup Database window. In the window click Browse which is located next to the Backup File option (see below image).
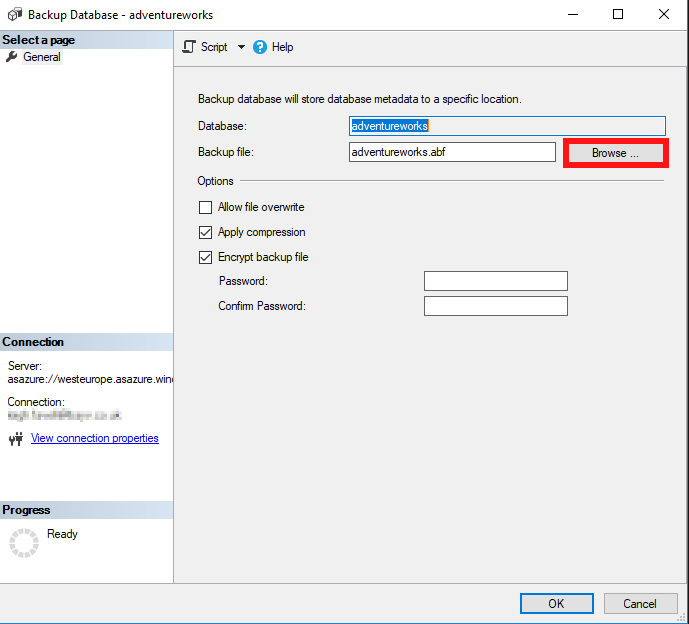
- In the Save File As dialog, verify the folder path and then type then name of the backup file and press OK.
- In the options section tick the required options. The below table goes over these options -
| Option | Description |
| Allow file overwrite | Select this option to overwrite backup files of the same name. If you don’t select this option and a file with the same name already exists, the backup will fail. |
| Apply compression | Select this option to compress the backup file. Compressed backup files save disk space, but will require a slightly higher CPU utilisation. |
| Encrypt backup file | Select this option if you wish to encrypt the backup file. You will need to provide a password to secure the backup file. By encrypting the backup, the only way to read the data on the backup is by doing a restore operation. If you do choose the encrypt the file, ensure that you save the password in a secure place. |
- Click OK to create and save the backup file.
Restore
To restore a database, you can again either use SQL Server Management Studio (SSMS) or PowerShell. This document will go over the restore process using SQL Server Management Studio which is documented below.
- Open SQL Server Management Studio and connect to your Azure Analysis Service resource.
- Once connected expand the database folder and right click the database you wish to restore, and press Restore.
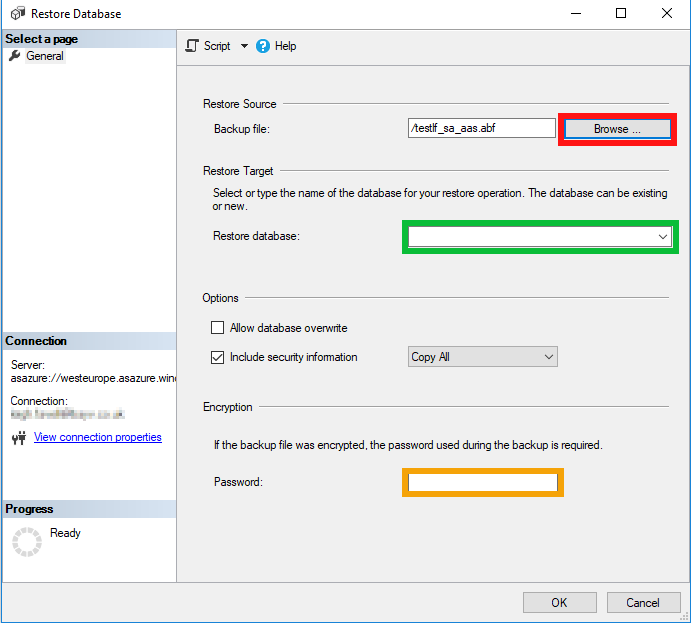
- This will open the Restore Database window. In the window select Browse which will open the Locate Database Files window. (red box in below image)
- In the Locate Database Files window, select the file you want to restore and then press OK.
- In the Restore Target section select the database you wish to restore. (green box in below image)
- Specify the options the require.
- If you entered a password when backing up the file, enter that same password in the relevant field. (orange box in below image).
- Press OK to restore your database.
Configure Server Firewall
- Go to your server overview page.
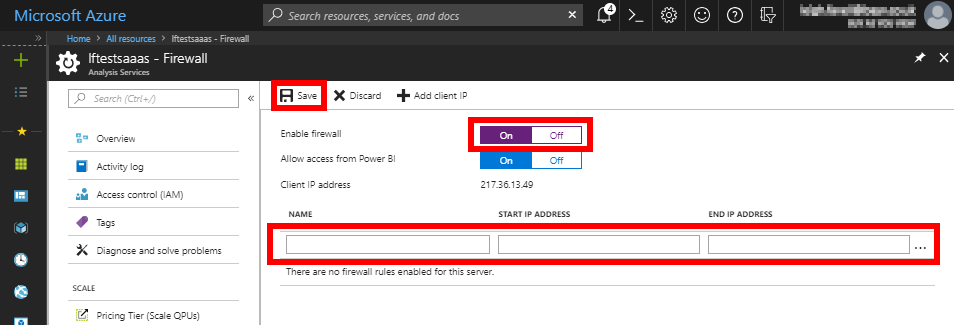
- In the Settings section of the overview menu select the Firewall option.
- In the Firewall page that is disabled, click On to turn on the firewall.
- You can easily allow Direct Query access from Power BI by clicking on for the Allow access from BI switch.
- You can enable access for one or more IP address ranges by entering a name, starting and ending IP address for each range.
- Click Save to enable the rules and save your choices.


Post your comment on this topic.