In order to create an Azure SQL Database, several resources need to be created beforehand. Some of these can be created during the database creation stage, but this document will show them individually, although the steps are generally the same.
The items required are:
- Resource Group.
- Azure SQL Server.
- Azure SQL Database Elastic Pool (this is optional and may not be required).
Throughout this document you will be asked to enter names for each of the objects you are creating. Some fields will be limited to certain characters and some aren’t. It is recommended that you follow some sort of naming convention to ensure the names are descriptive and understandable.
For additional information on Azure naming conventions, please see Naming rules and restrictions.
Creating a Resource Group
A resource group is a container that will hold related resources for your azure solution. The group can either hold all the resources for a group, or certain items that you may want to manage as a group which will share the same deployment plan.
- Press the “Create a resource” button
- In the search bar at the top of the marketplace windows, type in “Resource Group” and press enter to search for that resource.
- From the list of results select “Resource group”
- A new window will open which will show details of the resource group. Press the create button which is located in the bottom left of the window.
- A new window, which is shown to the right, will open which will allow you to enter the details for the new resource group. The below table describes each of the fields.

| Setting | Suggested Value | Description |
| Resource Group Name | Any descriptive name | Although any text can be entered, it is recommended that something descriptive is used to allow your users to easily identify the group name and its purpose |
| Subscription | Your Subscription | |
| Resource Group Location | Any Valid Location | This location should be valid for the location it is required. I.e. setting up a group in Australia East to be used in America may cause some issues. For more information on regions, please see |
- Once you have completed the fields, press create at the bottom of the tab and this resource group will then be created. You can check the status of the build in the notifications window found in the top menu of the azure window.
Creating an Azure SQL Server
An Azure SQL Server is required to host any Databases or Elastic Database Pools for a SQL Database, host any SQL Data Warehouse databases or can be used as the remote endpoint for a SQL Server Stretch database. The following steps will go over creating a new SQL Server in Azure.
- Press the “Create a resource” button.
- In the search bar at the top of the marketplace window search for “SQL Server” and press enter to search. This will open a new window which will show the results.
- In the list should be “SQL Server (logical server)”. Select this option which will provide you with a new window which describes the item you have selected.
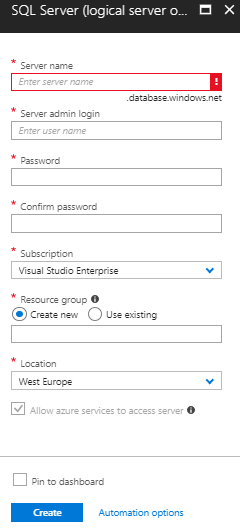
- Press the create button which is located in the bottom left of the new window. This will provide you with the window shown to the right which will allow you to fill in the various options and create your SQL Server.
- Complete the form using the below table as a guide to filling in each field.

| Setting | Suggested Value | Description |
| Server Name | This needs to be a globally unique name. | This is the name given to the SQL Server and will be used when creating SQL Databases or Elastic Pools against this server. The server name can only contain lowercase letters, numbers and (-), but can’t start or end with (-). The server name must also be 63 characters or less |
| Server Admin Login | Any Valid Name | |
| Password | Any Valid Password | Your password must have at least 8 characters and must contain characters from three of the following categories: upper case characters, lower case characters, numbers and nun-alphanumeric characters. |
| Subscription | Your Subscription | |
| Resource Group | The resource group that this server will belong to | Remember that all items in a resource group share the same lifecycle. They are deployed, updated and deleted together. If you require this item to be on a different deployment cycle to what’s in the existing resource group, you will need to create a new group. |
| Location | Any Valid Location | This location should be valid for the location it is required. I.e. Setting up a server in Australia East to be used in America may cause some speed issues. For more information on regions, please see Azure Regions |
- Once you have completed the above fields, press create. This will take you back to the dashboard, but you can view the progress of the server creation by clicking on the notification icon in the top menu. See the below screen shots to see the different status messages.
Create an Azure SQL Database Elastic Pool
An Azure SQL Database Elastic Pool is a cost effective and simple solution for managing and scaling multiple databases that may have varying and unpredictable usage demands. Any databases add to an elastic pool, all sit on the same SQL server and share a set number of resources at a set price.
- Press the “Create a resource” button.
- In the search bar at the top of the marketplace window enter the text “Elastic Pool” and press enter to search.
- In the results window that pops up, select “SQL Elastic database pool” from the results.
- A new window will be shown which will give an over of the elastic pool. In the bottom left of this window press the Create button.
- A new window will open which will allow you to enter the details for the new Elastic database pool. The below table will describe each of the fields.

| Setting | Suggested Value | Description |
| Name | Any descriptive name | Although any text can be entered, it is recommended that something descriptive is used to allow your users to easily identify the purpose of the elastic pool. |
| Subscription | Your Subscription | |
| Resource Group | The resource group that this will belong to | Remember that all items in a resource group share the same lifecycle. They are deployed, updated and deleted together. If you require this item to be on a different deployment cycle to what’s in the existing resource group, you will need to create a new group. |
| Server | Select the server you would like the elastic pool to sit on | Remember that all databases you put in this pool will need to reside on this server. |
| Configure Pool | Select the pricing option that fits your requirements. Press Apply in the bottom left when happy with the options. | For more information on pricing, performance and size of elastic pools please see Elastic Pool Pricing |
- Once you are happy with the options you have selected, press the create button located at the bottom of the window. The window will then close and deployment will begin. You can see the status of the deployment in the notification option in the top menu bar.
Create an Azure SQL Database
An Azure SQL Database is a fully managed cloud database that will provide the broadest SQL Server engine compatibility.
- Press the “Create a resource” button
- Sometimes you will see the SQL Database option listed on the right hand side of the market place in the “Popular” section, but if you don’t simply do a search for “SQL Database” using the search bar at the top of the form. Once the search has completed select “SQL Database” from the search results or the popular list.
- Press the create button located in the bottom left of the window which gives you an overview of the SQL database.
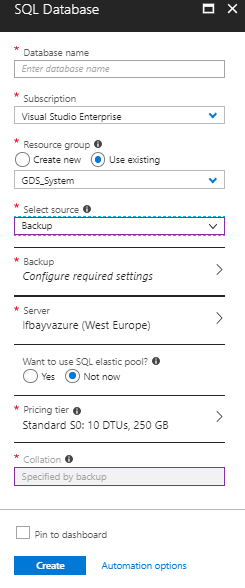
- A new window will open and present you with the fields required to create a new SQL database. The below table will describe each of the fields.

| Setting | Suggested Value | Description |
| Database Name | A descriptive name | A database name can’t end with ‘.’ Or ‘,’ and can’t contain the characters ‘<,>,*,%,&,;,\,/,?’ or any control characters. The database name can’t be any longer than 128 characters. |
| Subscription | Your subscription | |
| Resource Group | The resource group that this will belong to | Remember that all items in a resource group share the same lifecycle. They are deployed, updated and deleted together. If you require this item to be on a different deployment cycle to what’s in the existing resource group, you will need to create a new group. |
| Select Source | There are three options here. The default is Blank, with the remaining two being Sample and Backup. | Blank – This created a new blank database. Sample – This creates a new AdventureWorksLT sample database. Backup – This will create a new backup from an existing backup. If you select backup a new field will be shown which will allow you to choose the backup you want to use. |
| Server | Select the server you wish the new database to sit on | Remember that if you are going to put this database in to an elastic pool at a later date, it will need to be on the same server as that elastic pool and the other databases you want to go in to the pool. |
| Want to use SQL elastic pool | The two options are Yes and Not Now | If you select Not Now you will see a pricing tier option as the next field. If you select yes you will need to select the elastic pool from a list provided. |
| Pricing Tier | Select the pricing pool you wish to use for the database | You will only see this option if you select Not Now for the previous option. For more information on pricing, performance and storage for a database please see SQL Database Pricing |
| Elastic database pool | Select the elastic pool you wish to use | You will only see this option if you select Yes in the previous option. If you don’t see the elastic pool you wish to use, double check you have selected the correct server. |
| Collation | Recommended is the default unless you have other requirements. The default is automatically populated. | Database collation defines the rules that sort and compare the data. Once this has been selected and the database created it cannot be changed. If you are building a new database from a backup, then you will not be able to select a collation as this is specified by the backup |
- Once you have completed the form and selected the various options, press the create button at the bottom of the window. This will start deployment of the new database. You can check the progress in the notifications tab in the top menu.


Post your comment on this topic.